
Caulking is used to fill the gaps between two different or similar materials. Painters value prep-work as the foundation of a professional paint job. As trade skills go, caulking, like patching, is a skill that new painters tend to overlook. In a way, it’s understandable, since a new painter wants to get to the brush and the roller as quickly as possible. Prep work is usually not that noticeable and it is heralded much later, when the longevity of the painting project is evaluated. At Ecopainting we train every painter we hire on how to prep surfaces properly.
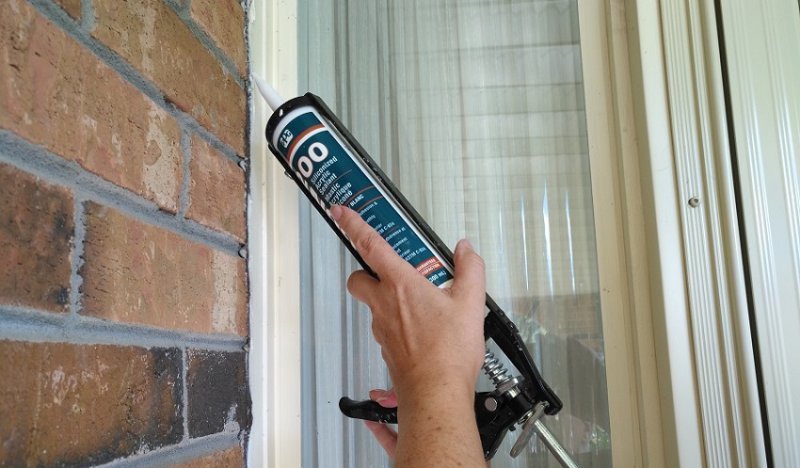
The role of exterior caulking is to protect the home from water intrusion. Moisture can damage the home’s elements, especially wood, and cause rot and mildew.
Interior caulking is used around kitchen countertops, bathrooms and around tub and shower enclosures. Preventing moisture from entering in gaps, this type of caulk has additives to stop mould from developing in humid environments. More often than not, silicone is used in kitchens and bathrooms. Silicone offers better adhesion and allows for more flexibility. Unfortunately, silicone is not paintable and therefore not very popular with painters.
Interior caulking is used for cosmetic reasons. In new construction, joints between wood panels require caulking before painting. The same applies to gaps between drywall and wood, especially around casings and baseboards.
Caulking can save a property owner money, not only by protecting building elements but also by stopping drafts from coming into the house.
Quality of Caulking Materials

There are different varieties of caulk for different purposes: polyurethane, stretchable types, acrylic, silicone, latex, paintable, etc. The best ones offer good flexibility, sometimes 25% and more. Considering the temperature variations we have in Toronto, there is a lot of expansion and contraction of building materials. The more flexible the caulk is, the better it will fill the gaps between moving materials. Some sealants are water resistant and some others can be exposed to occasional water submersion.
The quality of interior caulking is not evaluated by the flexibility alone. Sealants for interior painting must be easy to apply and tool, and they have to be paintable. When speed is of the essence, quick drying and curing times can speed up the job of the contractor.
Everything else being equal, the more expensive products are better. Every manufacturer has different grades available and some are rated by years of longevity. The 25 year grade is better than the 15 year one, but don’t expect them to last that long.
Use a Good Caulking Gun for Professional Results
Caulking guns are the tools that we use to apply the sealants. They come in two basic sizes, the industrial large one and the standard size we use daily. Caulking guns are relatively inexpensive tools. You can get a good quality one from a big box store for less than $20. A good quality gun will make the job easier and produce better and more professional results. The good ones are simple, comfortable to use and easy to clean. They allow the tube to be squeezed evenly, and give the user the ability to stop the flow before things get messy. In fact some of them call themselves dripless and they work great. A cheaper gun is more difficult to use and makes regulating the flow very challenging. This creates a big mess, a lot of caulk is wasted and the result looks unprofessional.
Considering the low purchase cost, a good quality caulking gun is a valuable addition to a painters tool box and will last for years. At Ecopainting we expect our painters to own and use a the best quality tools they can get.

The following are excerpts from Ecopainting’s Training Manual, covering interior caulking
“No gaps should be visible within painted trim elements and adjacent walls & ceilings.
Caulking should be smooth with no texture or ridges. Caulking should not fill trim profiles.”
- Ensure that all surfaces are completely cleaned, scraped, primed, patched, and sanded as needed. Surfaces should be clean, dry, and free of dirt, dust, loose flaking paint and loose caulking. (Be cautious to prevent slivers).
- Fill any gaps greater than 1/4” (6 mm) deep or greater than 3/8” (10mm) wide with backing material.
- Insert the caulk tube in the caulking gun and pull the trigger until the plunger is snug against the bottom of the tube. Cut the nozzle tip of the caulk tube at 30 – 45 degree angle to the desired thickness of the caulk bead (don’t cut it too big). Puncture the inner seal of the nozzle if needed.
- Place the open tip of the caulk tube nozzle in the joint. Hold the flat open side of the nozzle tip against to the joint/substrate surface so the caulk will flow into the joint.
- Draw a bead of caulk by squeezing the trigger of the caulking gun and pulling it along the joint in a smooth continuous motion. Release pressure on the trigger to stop the bead flow at the end of the joint.
- Smooth the caulk bead using a damp finger, cloth, sponge or caulk smoothing tool. Leave enough caulk to bridge and adhere to both surfaces. Wipe the excess off your finger with a cloth or rinse it off in a bucket of water.
- To minimize build-up in molding corners etc. use a small finger or thin rag.
- Allow the caulk to dry/cure sufficiently as per the manufacturer’s specifications prior to painting.
- Painting too quickly can lead to discoloration or cracking.
Everyday Caulking Tips:
- For big gaps use stirring sticks, pieces of sanding sponges or similar items to fill the space before caulking.
- Leave the largest bead of caulk possible while maintaining appropriate appearance. Larger beads accommodate more movement and reduce the chance of cracking.
- If using a wet rag to tool the caulking, be careful not to get residue from the rag on surfaces not to be painted. The caulk residue will leave a visible film on these surfaces when it dries.
- Interior caulking is mainly for cosmetic purposes. Caulking exterior surfaces is used more for protective/sealing purposes.
We find this video is full of accurate and useful information:
We hope you find all this information about caulking useful. Ecopainting painters are trained to perform prep work as per industry standards. Feel free to contribute to this blog and ask any questions, in the comments below.